Ruler
The Ruler is the classic measurement tool sitting right on your desktop. You can measure in pixels, inches, cm and mm. It also adds the ability to measure angles, simply by rotating the Ruler!

Table of Contents
- Changing units
- Measuring angles
- Settings
- Sizing the ruler
- Moving the Ruler
- Multiple instances
- Relative position within Ruler
Changing units
As one can expect, Ruler supports measuring in px, in, cm and mm. You can easily cycle between the units with the ` key.
The unit can also be changed from the settings panel.
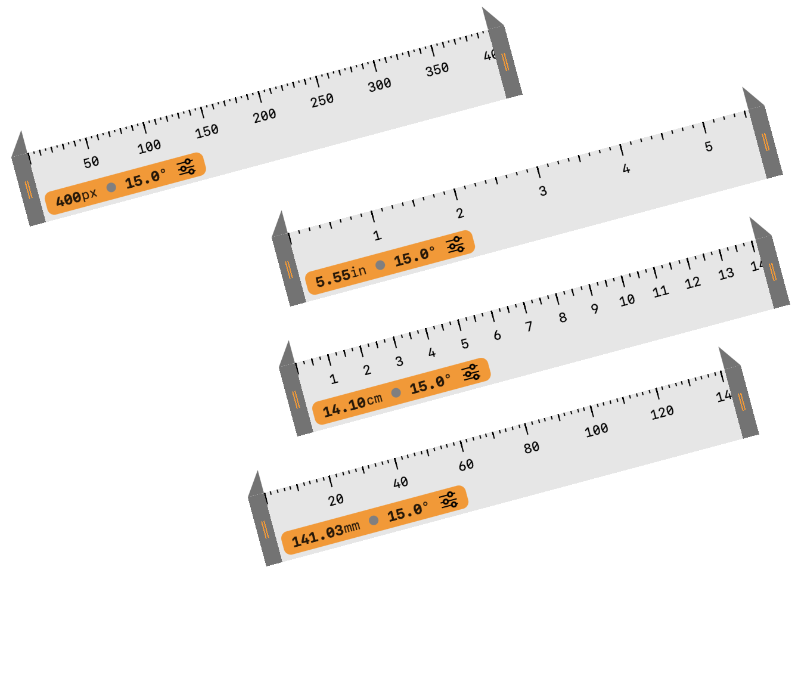
The metric units (in, cm, mm) are based on the DPI (Device Pixels per Inch) and can be different from the physical in, cm and mm.
Measuring angles
The Ruler is not just for horizontal and vertical measurements. You can also measure angles!
- Hold the
Commandkey and drag to rotate the Ruler. - Hold the
Shiftkey to snap at 5° angles. Press theSpacekey to snap to 90° angles in counter-clockwise direction. - With
ShiftSpaceyou can snap to 90° in clockwise direction.
For precise measurements, you can also use the keyboard shortcuts:
Command=to increment angle by 1°Command-to decrement angle by 1°- Hold the
Shiftkey to increment or decrement by 5° angles.
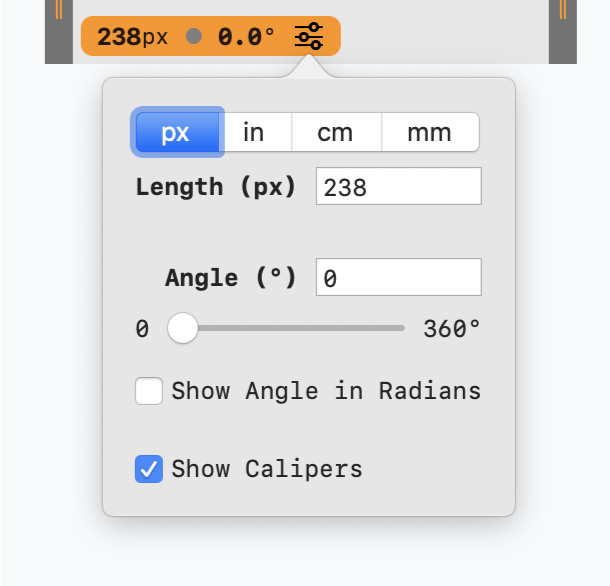
Angles can also be changed from the settings view. Use the slider to find the exact angle or feed in an angle directly. Any angle you type in will be converted between the 0 - 360° range automatically.
Degrees and Radians
For some scientific measurements, it is better to do it in Radians. Ruler supports that by switching the angle unit between degrees
and radians. Use the A key to cycle between them.
Settings
The settings popup gives a quick control of all the important Ruler functions. You also get precise control with the textfields for directly specifying the length and angle.
Sizing the ruler
The Ruler can be resized from both sides simply by dragging on the handles.
Sizing at the end
You can use the shortcuts as below for resizing from the end.
=to increase by 1px-to decrease by 1pxShift=to increase by 10pxShift-to decrease by 10px
Sizing from the front
There are keyboard shortcuts to resize from the front of the Ruler. These are shown below. These are essentially the same
combination as shown before with the addition of the Option key.
Option=to increase by 1pxOption-to decrease by 1pxOptionShift=to increase by 10pxOptionShift-to decrease by 10px
Note that the ruler can be sized to 0px. The info-bar on the ruler will be always visible and ensure you can read the measurements irrespective of the size and angle of the ruler.
Calipers
Calipers are handy indicators to help you get more precise with measurements. You can toggle their presence with the C key.
Moving the Ruler
Ruler can be moved around the screen simply by dragging on it. For more precise control, you can rely on the keyboard shortcuts:
←to move left by 1px→to move right by 1px↑to move up by 1px↓to move down by 1px
For bigger jumps, use the Shift key and the arrow keys to move by 10px.
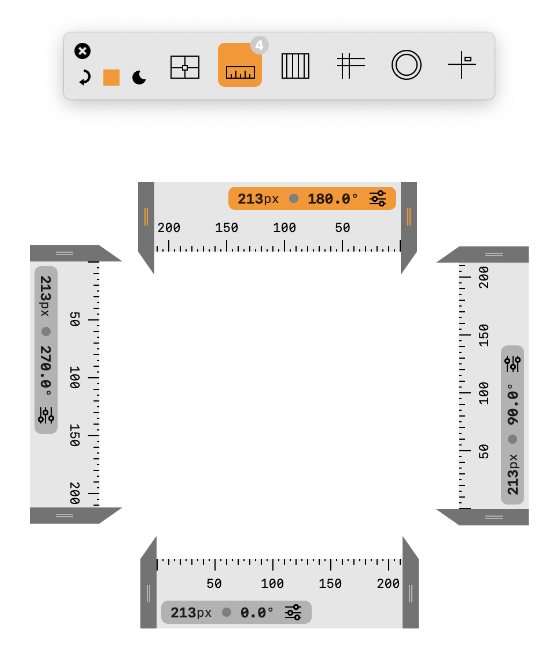
Multiple instances
Ruler can have upto 4 instances open. This allows you to take multiple measurements and compare. Use the keyboard
shortcut Command 2 to open more instances. You can also do this by holding the Option key while clicking on the
ruler icon-button in the Tool Palette.
Relative position within Ruler
When the Ruler is in horizontal or vertical orientations, you can move your mouse along the Ruler to see its relative position. The position is shown as a thin needle. This can be seen in the video below:


- Copyright © 2021 PIXELINGENE LLC. All Rights Reserved.
- Terms of service • Privacy Policy
- Photoshop ® is registered trademark of Adobe Inc.
- Latest release build:
2.8.644